Creating Spawn Logs - organization and good photography
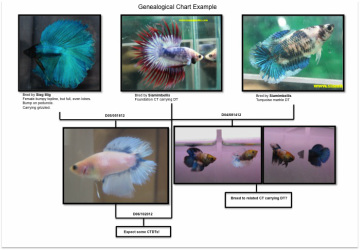 Genealogical chart example
To the left is small example of how to record my spawns.
I give each spawn its unique date, usually the date that they become free-swimming. Any earlier and you never know...eggs could be infertile, Dad could eat the eggs, kill the fry, etc...so I like to do free-swimming because then I know it's in my hands, not his fins ;) I use that date as a kind of barcode, and I label the tanks that those bettas are in, as well as any that I jar, with that unique number. The few that I eventually show or breed, I take a picture of.
Eventually, once my lines get so complicated that PowerPoint will no longer be able to handle them, I will be using Genepro. Genepro is a genealogy software that was recommended to me by Joep, and it looks awesomely easy to use! You can link each unique symbol with a picture of the fish, and with other relevant notes. It can be found here (http://www.genopro.com/)
I try to take the absolute best pictures that I can. I resisted it for a long time (I'm kind of a cheapskate bargain hunter), but I finally decided that upgrading to a better camera and actually learning fish photography techniques would be worth the record keeping oomph. I purchased a Nikon D3100 with the help of my fish photography gurus Christine Tanner and Minh Nguyen, and also after reading very helpful reviews from Ken Rockwell's website. I do want to stress that purchasing a fancy camera just makes it slightly easier - getting a good shot is about the correct set up and some practice and luck.
|
The most important is the set-up. Use a clear container with flat sides. Place it on a light colored surface (preferably white) to reflect the light up to illuminate the bottom of the fish. Use a white background (or a black background if you are photographing a white fish). You will want to have on hand several white fluorescent lights in the front and possible from the sides as well. Also be sure to clean the front of the photo tank very well to remove water marks!
My photo tank is glass, which makes it easy to clean and polish. I had an acrylic divider especially cut for my tank at TAP Plastics. They were awesome and were very patient to cut it to fit my tank perfectly despite the slightly strange inner dimensions, and it cost me less than $2! I especially like the fact that I can move the divider around, and squish one betta if I need to (like when I was trying to measure the Giant betta below).Anything that has clear and flat sides would work though. Be sure to clean the front, because nothing screams amateur like having water spots fuzz up your photographs (which I still do occasionally). When you are taking pictures, keep in mind that you are shooting through a reflective surface. Always angle the camera slightly so that you don't get glare from the glass/plastic.Then I fill the tank with warm, treated, and clean water and let it sit for a while, so that the bubbles collect on the sides. I then brush off the bubbles with a small toothbrush. I put a purple plastic divider between the two compartments so that they cannot see each other until I remove the divider. I carefully set the photo tank inside my light box, and then I pop in my two bettas to acclimate. Upon removal of the purple divider, they usually start flaring like crazy! Then it is take as many pictures as possible! I have to stress that only 1 out of 10 pictures (if you're good) will be worth keeping. Just keep clicking away and adjusting the settings until you're happy with it! The following two web pages are INCREDIBLY helpful in getting started on fish photography. Try not to drool on the computer screen: - Aquarium Photography Part 1 - Aquarium Photography Part 2 My go-to camera is my Nikon D3100 with the 35mm prime (fixed) lens. For a little less than $200, this thing is a beauty - incredible sharpness for such a "cheap" lens! Although the focus is fixed, the images are so clear that you can crop down to a tiny fraction of the original RAW picture with MINIMAL pixilation. Amazing quality! The 18-55mm kit lens is a quality lens as well, although not up to par with the 35mm. |

Basic photography set up, before I started using a lightbox. Now it is pretty much the same but with the photo tank inside the light box and the light coming in front the top and front.
My new, super cheap "light box". Basically the inside is covered in white copy paper and I put fluorescent on the top and from the front.
|
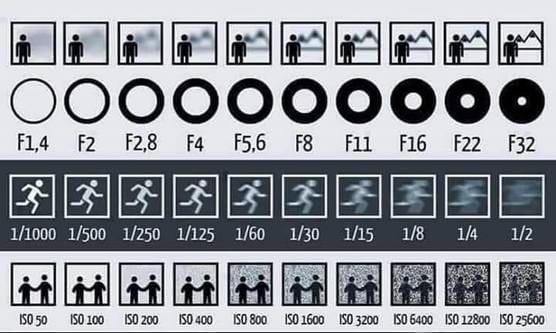
DSLR Settings
F stop: F (second row) controls the aperture, or how much light comes into the lens. You can see that the higher the F stop, the smaller the aperture, which increases the depth of focus (top row). The deeper the depth of focus, the more of the picture will be in sharp focus. You can see that at very low F stop, only the man is in focus and the background is a lovely blur. This is great for focusing attention on a specific part of the photo (ie like the head) but then it is easy for the rest of the body to be out of focus. For fish, F8-11 is best for getting the whole body in focus.
The problem with increasing the F stop is that less light can get in, making the photo darker. (Hence - MOAR LIGHT!) Another way you can compensate is by adjusting the shutter speed. The longer the shutter is open, the more light can get in, making the picture brighter. This is especially good in low light conditions. However, the longer the shutter is open, the slower the shutter speed, and the more likely your picture will turn out blurry! A good shutter speed for taking a photograph of a fast-moving flaring betta is about 1/125 or 1/160. Any faster the available light is severely restricted, making the photograph really dark or underexposed.
If you can't get any outside sources of light, you can adjust the ISO sensitivity. As you can see on the diagram, the lower the ISO, the better your picture quality will be. There will be less graininess to the photo's blank space. An ideal ISO is around 100-200 to get the best quality, which can make a big difference. However, the lower the ISO, the more light you will need to avoid the dreaded underexposure!
Lastly, if you really want to go pro, then you'd better get used to manual focus instead of automatic focus. Excited fish move pretty darn fast, so the autofocus function on the automatic settings of many cameras can have a really hard time following the fish. Turning off the automatic focus and relying on your own focusing skills helps a LOT. You learn how to quickly focus on exactly what part of the fish you want to photograph clearly, and you can make your camera take any picture at the exact right time that you want it to!
So you can see that adjusting the settings takes a little bit of practice. Again, play with your camera and see what works for you!