Life has been busy! And it's only going to get busier ;) Between preparing/teaching/grading my medical microbiology class and filling out mountains of job applications, it's really nice to just chill out in front of the Xbox when I do have free time. Sorry about that! I have a lot of material that has been sitting around that needs to get onto this website!
I am also chairing the May CBS IBC show, which will occur May 23 at the Embassy Suites Hotel. A formal post with all important information will follow!
Lastly...CBS will be hosting an online show in the middle of April. This show will take place on Facebook. It is mainly a way for breeders to get commentary on pictures/videos of their fish by judges from all over the world. This is the first time that anything like this has ever been done, and it will be interesting to see how it turns out!
My friend took a video of my impromptu and highly disorganized discussion on fish photography. Hopefully something makes sense! Remember, the most important thing is the set up of the fish (NOT the equipment you are using). When in doubt, MORE LIGHT.
The most important is the set-up. Use a clear container with flat sides. Place it on a light colored surface (preferably white) to reflect the light up to illuminate the bottom of the fish. Use a white background (or a black background if you are photographing a white fish). You will want to have on hand several white fluorescent lights in the front and possible from the sides as well. Also be sure to clean the front of the photo tank very well to remove water marks!
When you are taking pictures, keep in mind that you are shooting through a reflective surface. Always angle the camera slightly so that you don't get glare from the glass/plastic.
Smartphones can have very powerful cameras, and a lot of breeders I know just use their phones to document their spawns! They are somewhat limited because you can't change some of the settings that you can on a dedicated camera, and it can be difficult for them to focus on fast moving objects.
Small digital cameras can take some really wonderful pictures. During the class I realized how wonderful my old Canon Powershot was and was questioning by I even bought a DSLR lol. Great digital cameras can be found really cheap on Craigslist ($50 or less). Instead of just using auto, tweak the settings a bit to get even better photos. Switch the dial to "P" for program (sometimes "M" for manual), which will allow you to adjust all the settings. Turn on the macro setting (the flower symbol) to switch the autofocus closer to the lens. Next set the white balance to auto, and the ISO to the lowest setting possible (100 or 200) for a sharper picture. Lowering the ISO will darken the picture, so be sure to have a LOT of light. Lastly, turn on the forced flash so that the flash will go off every time you take a picture. Be extra careful of angling the camera down to avoid glare.
Lastly, DLSR cameras can yield fantastic photos! But you need to learn how to adjust the settings. Auto settings on a DSLR just don't work that well for fish photography. The best guides that I have found for DLSRs specifically for fish photography can be found here and here. Also, button mashing helps to familiarize yourself with all the features that a DSLR has! You will find that every camera is different, and it takes a while to get to know your own camera.
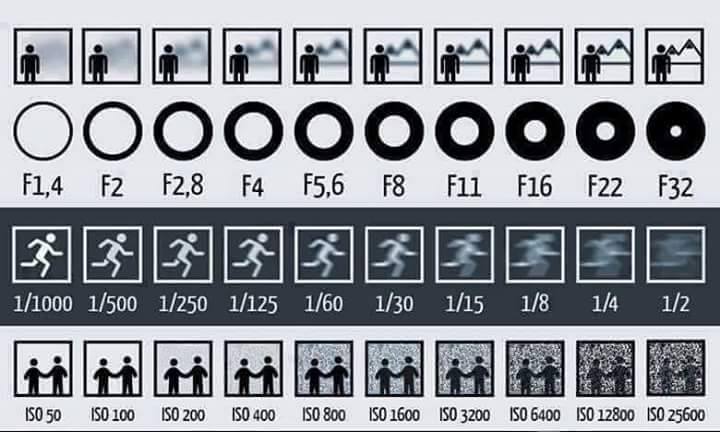
Ariel P., my right-hand woman (CBS Vice Prez) found this awesome graphic showing how the changing the settings on a camera affect the picture!
F stop: F (second row) controls the aperture, or how much light comes into the lens. You can see that the higher the F stop, the smaller the aperture, which increases the depth of focus (top row). The deeper the depth of focus, the more of the picture will be in sharp focus. You can see that at very low F stop, only the man is in focus and the background is a lovely blur. This is great for focusing attention on a specific part of the photo (ie like the head) but then it is easy for the rest of the body to be out of focus. For fish, F8-11 is best for getting the whole body in focus.
The problem with increasing the F stop is that less light can get in, making the photo darker. (Hence - MOAR LIGHT!) Another way you can compensate is by adjusting the shutter speed. The longer the shutter is open, the more light can get in, making the picture brighter. This is especially good in low light conditions. However, the longer the shutter is open, the slower the shutter speed, and the more likely your picture will turn out blurry! A good shutter speed for taking a photograph of a fast-moving flaring betta is about 1/125 or 1/160. Any faster the available light is severely restricted, making the photograph really dark or underexposed.
If you can't get any outside sources of light, you can adjust the ISO sensitivity. As you can see on the diagram, the lower the ISO, the better your picture quality will be. There will be less graininess to the photo's blank space. An ideal ISO is around 100-200 to get the best quality, which can make a big difference. However, the lower the ISO, the more light you will need to avoid the dreaded underexposure!
Lastly, if you really want to go pro, then you'd better get used to manual focus instead of automatic focus. Excited fish move pretty darn fast, so the autofocus function on the automatic settings of many cameras can have a really hard time following the fish. Turning off the automatic focus and relying on your own focusing skills helps a LOT. You learn how to quickly focus on exactly what part of the fish you want to photograph clearly, and you can make your camera take any picture at the exact right time that you want it to!
So you can see that adjusting the settings takes a little bit of practice. Again, play with your camera and see what works for you!
 RSS Feed